From the land of Gujarat we have yet another classic recipe. This one is called Chori/Chawli/Green Beans/ Yard long beans and if you are from other parts of Asia, you may also know this as DowGok. Alot of times this vegetable is commonly associated with the french green beans. It is fairly similar however a lot more chewier. One can eat them raw, stir fried or even deep-fried.
So the next question is how to buy these long beans? Look for beans that are smaller and flexible with no dark spots. The peak season to find these long beans is in the fall however certain states and supermarkets have them available year-round. As for storage, the long beans can be refrigerated for up to five days.
Ingredients:
2.5 cups chopped long beans (chori/daw gok)
2 Tbsp oil
1/4 tsp jeeru (cumin seeds)
1/4 tsp ajwain (carom seeds)
1/4 tsp turmeric powder
1 tsp red chili powder
1.5 tsp dhana jiru (coriander cumin powder)
1/4 tsp garam masala
salt as per taste
lemon juice for topping (optional)
coriander/cilantro for topping (optional)
Directions:
Wash and cut fresh long beans bunch to your desired length.
Heat the oil in a thick bottom pan/non-stick pan. Add cumin and carom seeds.
Add chopped chori, red chili powder, turmeric powder, dhana jiru powder, garam masala and salt. Stir and close the lid for 1 minute.
Open the lid, stir , close the lid and cook on low flame for 7-8 minutes. Stirring in between.
Turn off the flame, sprinkle some lemon juice and coriander leaves.
Originated from Syria and a very important part of Levantine and Israeli cuisine. The word muhammara means “red” and it very adequately describes the vibrant color you’ll get from making the dip.
My first time exposure to this delicious dip was in Baltimore, MD where I use to travel often for work purposes. Right near the harbor, there is an excellent family owned restaurant called Lebanese Taverna. They serve the most tastiest Mediterranean platter which consist of baba ganoush, hommus, falafels and muhammara with freshly baked pita. The sweet, savory and creamy texture of Muhammara is something your tastebuds will never forget. It so hard to stop eating once you start.
Few of my friends were coming over for brunch and the planned menu was Mediterranean. I knew I had to recreate this stellar dish for them. After reading through numerous recipes, I used Minimalist Baker’s recipe as a guide. This dip can be made in less than 30 minutes with minimal prep. My friends definitely were a huge fan of this sweet, savory and nutty dip. A great pairing would be pita chips, warm pita, pretzels,crackers or vegetables.
I would love to hear about your experience making it, if you snapped some shots of it, share it with me on Instagram so I can repost on my stories!
Ingredients:
3 red bell peppers*
1/2-1 cup raw chopped walnuts
2-3 Tbsp bread crumbs or panko bread crumbs
1 tsp cumin seeds or ground cumin
1 Tbsp pomegranate molasses*
1/2 lemon juiced
2 tsp crushed red pepper flakes*
1 tsp grated ginger
Za’atar for topping (optional)
Salt as per taste
Directions:
To roast bell peppers:
Preheat oven to 400 degrees. Place your red bell peppers on a sheet pan and coat them with olive oil or nonstick spray.
Bake for 20 minutes, flipping halfway until you get a nice roast on the skin.
Once baked, remove from the oven and start to take the skin off. You can leave the skin on if you prefer. Otherwise with a fork or by hand remove the skin.
Cut in half and de-seed the inside of the peppers. Be careful when handling hot/warm peppers.
2. In a food processor or blender, add your walnuts, bread crumbs, pomegranate molasses, red pepper flakes, ginger, lemon juice, cumin, and salt. Pulse until all the ingredients are combined
3. Add roasted bell peppers and pulse few times until mixed.
4. Ensure it does not become pureed. This dip tastes best when left a bit grainy.
5. Sprinkle za’atar and serve it warm or cold with pita or vegetables.
Tips:
*Jarred roasted bell peppers can be substituted for fresh bell peppers
*Pomegranate juice can be substituted for pomegranate molasses. If you really can’t find the molasses, then lemon juice and honey would be alternative.
A quick way to make molasses, heat 1/3 cup of pomegranate juice , bring it to a rolling simmer and keep it simmering for about 20 minutes. It should reduce in quantity and start to thicken up.
*Cayenne pepper or Paprika can be substituted for crushed red pepper flakes. It can be overpowering therefore use it at your taste discretion.
*If you are a fan of garlic, then add 1-2 garlic cloves after processing the walnuts mixture.
*Let it chill before serving. However, if you are crunch on time you can serve it warm/room temperature.
*If you are unable to find Za’atar, a great substitute is Knorr Taste of Middle East World Flavor Seasonings, which can be easily found at your local Walmart or grocery stores.
A total knockout cauliflower casserole which is low carb and keto friendly. This is so easy to make and the most delicious comfort food. It could serve as a great side dish or main dish. I used the Steam Fresh frozen cauliflower florets however fresh cauliflower florets would be ideal. The flavors in this recipe remind you of a loaded baked potato, so even if you are not on that ketogenic diet flow, this recipe will definitely hit the spot. A total knockout cauliflower casserole which is low carb and keto friendly. This is so easy to make and the most delicious comfort food. It could serve as a great side dish or main dish. I used the Steam Fresh frozen cauliflower florets however fresh cauliflower florets would be ideal. The flavors in this recipe remind you of a loaded baked potato, so even if you are not on that ketogenic diet flow, this recipe will definitely hit the spot.
Ingredients:
1 large head cauliflower, cut into small florets OR 1 bag of frozen cauliflower florets
1/2 cup chopped celery
4 oz cream cheese, softened
2/3 cup sour cream
1.5 cup shredded Cheddar cheese
1/3 cup green cilantro or parsley (optional)
Salt as needed
1/2 teaspoon black pepper
1/2 teaspoon paprika or chili powder
1 finely diced jalapeño (optional)
Directions:
Prepare a small casserole dish or tray with non-stick spray.
In a steamer insert over boiling water, steam the cauliflower florets for 5 minutes, until crisp-tender. Remove from heat, and drain to remove excess water.
For frozen cauliflower, place the frozen cauliflower in the air fryer at 350F for 10 mins or until they are crisp tender.
In a large mixing bowl, stir together the sour cream and cream cheese, until smooth. Stir in the cheddar cheese, chopped parsley, jalapeño, salt, pepper, and paprika. Add the cauliflower florets and celery to the bowl and mix with the cheese mixture.
Pour the cauliflower mixture into the casserole dish or tray. Top with the cheddar cheese mix.
Bake for 15-20 minutes at 350F in the oven or the air fryer until the cheese melts and the sauce is bubbly.
Tips:
You can use broccoli as a substitute for cauliflower or use both broccoli and cauliflower. Just ensure to increase the amount of cream cheese and cheddar cheese mixture.
If you consume onion and garlic, add 1/4 tsp garlic powder to this recipe to enhance the flavors
If you do not have air fryer, you can pan roast the cauliflower after steaming. It will give it nice chard flavor.
When baking in an air fryer, keep an eye towards the end as the florets can start burning or overcooking in the mixture.
Whichever method you use to cook the cauliflower, ensure to remove the excess water. This will keep the mixture creamy.
Rotli/Roti/Chapati/Phulka, are a whole wheat soft and thin bread usually cooked on iron skillet and puffed on direct flame. Making these Rotlis can be overwhelming for first timers however with lots of practice and experience, they become second nature. These Rotlis are a staple to almost every Indian meal. I certainly grew up eating them and at the age of 13 is when I first learned how to cook these Rotlis.
I remember my mother badly fractured her arm due to a serious ice slip accident. I use to come home from school (I was in eighth grade) and start making food with her directions while resting in bed. I was scared and didn’t know what to do, especially when it came to making these Rotlis. I barely knew how to make the dough correctly, let alone make them round. Knowing my father who is very particular about his food and always likes his food the usual way. I was very skeptical and scared what if he wouldn’t like my way of cooking. In a way he even sensed my insecurity. However, being such a strong supporter he encouraged me to cook more, he would always say that I will eat your Rotlis regardless of what the shape is. Just keep cooking, you will become expert in no time. Boy! he was right, thanks to my parents encouragement, I am so much more confident and fearless in the kitchen and experimenting with new recipes. I am what I am because of my parents. This blog post is a small dedication and a thank you to my parents. I am pretty sure this is not the last blog post honoring them. 🙂
Ingredients:
1 cup Whole Wheat Flour
1/2 teaspoon Salt
1 teaspoon of oil*
Ghee to spread on top of the rotlis
Dry Flour to roll the dough balls*
Utensils needed:
Rolling Pin
Chopping board or Rolling board
Tongs
Nonstick pan or griddle
Wire Roaster*
Please checkout my Instagram page for a short video to see how the wire roaster is utilized.
Directions:
Mix flour, salt and oil to a mixing bowl. I normally mountain the flour and create a crater in the middle to add oil and salt.
Slowly add the water little bit at a time and mix it in with the flour using your dominant hand. Keep adding water and kneading until soft dough (but not sticky) forms.
Knead for 4 to 5 minutes or until even and smooth dough forms. Cover the dough and allow it to rest for 10 to 15 minutes. If you are crunch on time, you can get right into it.
Heat the tawa or a griddle on medium heat. Form lemon sized balls.
If using induction or electric stove, heat the wire roaster on another stove top.
Take one dough ball at a time and roll it in the dry flour so that it is evenly covered with flour. Make sure to cover your rolling pin with flour as well.
Gently press the dough ball to flatten it into a thick disc and then roll it back and forth using a rolling pin, with gentle pressure in a clockwise form.
Carefully place the rolled rotli on the preheated pan and cook for 30 to 45 seconds. You should start to see bubbles form, thats your cue to then flip the rotli over with a pair of tongs and allow the side touching the pan to fully cook. About a minute or so, or until the roti starts to get light brown spots over.
Cautiously lift the pan with one hand (non dominant) and pick up the Rotli using the pair of tongs and place it upside down on the wire roaster. You can increase the flame to high until it puffs up. It takes approx 30 seconds. Flip it once and take it off the stove.
Place it in a dish and apply ghee as per your preference or you can eat it without ghee as well.
*Dough can stay at room temperature for an hour or so. In an airtight container you can refrigerate for 2 to 3 days.
*Dough should be smooth and adjust the water quantity as necessary. I normally use Aashirvaad Whole Wheat Atta.
*Dry flour can be all purpose flour or whole wheat flour.
*Use your choice of oil, Olive Oil or Vegetable Oil are preferable.
*Wire roaster is a must if cooking on electric or induction stove, however on a gas stove you can skip the wire roaster and puff the Rotlis directly on the
*Cooked Rotlis can be kept in an airtight container, refrigerated for 2 to 3 days. Some keep it upto a week, however I feel you start to loose the freshness.
Let’s talk about Black Eyed Peas, no not the band, although I love all of their songs. So what are Black Eyed Peas? A legume and depending on which part of the world you are from there are many different names like Cowpea, Hoppin’ John, Lobia, Chawli etc. Aside from Indian cuisine, it is widely used in traditional soul food. In Europe, its dressed with olive oil and vinegar to be used as a salad. Whichever way you prefer, its packed with calcium, protein, fiber and very diabetic friendly. I am a huge fan of legumes, black eyed peas rate pretty high on the list.
So what about those Kala Chana? First of not sure why they are called kala chana but in reality they are dark brownish. Never understood that translation nore found any credible information about it. Kala Chana is another legume which is rich in protein, and iron. It is used in many Indian dishes and could be made into different varieties. One variety you will find is during North Indian festivities, when it is served with puri halwa. Interestingly, the soluble fiber in black chickpeas binds the bile acids and prevents it from being absorbed by the body, thus reducing cholesterol levels. Daily consumption of around 3/4 cup of chickpeas helps to decrease LDL cholesterol and total cholesterol triglycerides. So just like our friend black eyed peas, this legume is also diabetic friendly.
The below variations of black eyed peas and brown chickpeas are just some ways to enjoy this legume. I am a fan of simplicity and love a dish that is packed with flavors. These can be enjoyed on a lazy cooking day or rainy days. Of course, if you don’t have both of these legumes on hand, you can utilize one or the other.
I hope you like and try at least one of these methods.
Black Eyed and Brown Chick Peas Curry
Ingredients:
1/2 cup black eyed peas , soaked overnight and drained OR 1 can of black eyed peas.
1/2 cup brown chick peas, soaked overnight and drained
1-2 Tbsp Oil*
2 cups water
1 cup diced tomatoes or paste
1/2 cup diced carrots* (optional)
1/2 cup diced bell peppers/capsicum*(optional)
1/4 tsp cumin seeds
1 tsp of turmeric powder
1 tsp chili powder or paprika
1 tsp garam masala
1/4 tsp black pepper
1- 1.5 tsp ginger , chopped or grated
1 Tbsp lemon juice
1/3 cup of chopped coriander/cilantro* (optional)
Salt to taste
Directions:
Take both of the soaked peas , salt, 2 cups of water and add it to a pressure cooker. Cook for at least 3 whistles.
Allow the pressure cooker to cool down before opening the lid. Drain the peas to discard all the water.
Heat oil in a pan, add cumin seed, let them crackle and ginger.
Add the tomatoes and saute on a medium setting for about 2-3 minutes.
Add all the spices (turmeric, chili powder, garam masala, black pepper, salt) and cook for additional 2 minutes until all the spices get incorporated into the tomato mixture.
Add the cooked peas, along with water and cook for 5 minutes on medium setting. Stir occasionally.
Garnish with coriander , add the lemon juice and serve it hot with rice or roti
Tips:
*Vegetable or Canola Oil taste best, however Olive oil will taste good as well. Also, adjust the amount if cooking in large quantity.
*If you like it spicy, adjust the amount of chili powder and garam masala. You can also adjust the ginger amount to your taste buds.
*If you eat onion and garlic, saute chopped onion and garlic before adding your tomatoes.
*Carrots and Bell Peppers are completely optional, I happened to have them in the fridge so decided to add it in.
*I like using fresh tomatoes in this recipe, however tomato paste or sauce works perfectly fine in this recipe.
*Normally I soak these black eyed peas for at least 12 hours before cooking, however if you are short on time, the canned black eyed peas work perfectly well.
*You can eliminate one of the peas if you do not have them on hand. This can be made without one or the other.
Mixed Peas Salad
Ingredients:
1/2 cup black eyed peas , cooked
1/2 cup brown chick peas, cooked
1/2 cup bell peppers (any colors)
1/2 cup tomatoes, chopped
1/4 cup of coriander/cilantro, chopped
2 Tbsp of jalapeños
2 Tbsp lemon or lime juice
1 tsp chili powder
1 tsp dhana jiru (coriander cumin powder)
1 Tbsp chaat powder
1/4 tsp crushed black pepper
Salt to taste
Directions:
Pressure cook the legumes as mentioned above. Traditionally when I cook legume, I make large batch so I can use the cooked legumes multiple ways.
Mix all the ingredients together. Adjust the spices and salt according to your taste.
This mixture can be made and stored upto 1 day in the fridge.
Tips:
*Adjust the spices according to your taste. For milder version, omit the jalapeños.
*This salad can be prepared 1 day in advance in case you are serving for a party. Can be served alone or with tortilla chips.
*If you eat onions, add 1/3 cup of red onions to the mixture.
Okra/Bhindi/Ladies Finger is one of those extraordinary vegetables that is commonly consumed in Indian household. The great part about this vegetable is that it could be eaten in every form, deep fried, air fried, pan fried, with gravy or pair it with another vegetable like potatoes. Okra is super rich in Vitamin A and nearly half of it is soluble fiber (good for your cholesterol and your tummy), at some levels it also has the ability to manage diabetes (google for studies conducted in China). When you cut open an Okra, there is a sticky substance known as mucilage present in the pod.
When I was little, I have memories of days when my mom use to cut the Okras and I would playfully use the pods ends to stick on my face, hands and legs. (Yes, I was that odd child who wasn’t afraid to play with food..haha). So how do you know that you are buying the best and freshest Okra? Look for firm exterior. Avoid any blemished pods and the most important way is , when you bend the tip of Okra, it should snap easily. Ensure you pat dry and store it in paper towel if not using the same day of purchase.
The recipe below is a very simple, traditional way of making Bhindi. As with many recipes, Bhindi Masala recipes vary by regions in India therefore you may find more than one way to make this delicious vegetable.
Ingredients:
1-2 lb Okra, chopped (about 2-4 cups)
1/2 tsp cumin seeds (optional)
1/2 tsp ajwain seeds
1 tsp chili powder (adjust as per your spice tolerance)
1/2 tsp turmeric powder
1/4 tsp garam masala (optional)
2 tsp coriander powder
2 Tbsp Oil*
Salt to taste
Lemon juice (optional)
Coriander/Cilantro for garnish
Directions:
In a non stick pan heat oil and add the cumin seeds and ajwain seeds. Let them crackle.
Add the bhindi with turmeric powder and mix well on a medium flame for 5 minutes covered.
Toss occasionally and uncover. Now add the coriander powder, salt, chili powder, garam masala, mix well and cook on medium flame for another 5 minutes.
Do not allow any water formed on the bottom of the lid during condensation to fall in the curry. Check and cook until soft and cooked.
Take it off the stove and garnish with coriander and lemon juice. Serve hot with roti (flatbreads), pita or naan.
Tips:
*When cooked on lower heat over longer period, tastes alot better.
*Alternative for adding spices, you can add them ahead of time to the Okra before tossing it in the hot oil
*If you like it spicy, adjust the amount of chili powder.
*Vegetable or Canola Oil taste best with Okra. Also, adjust the amount if cooking in large quantity.
*Stirring too often can lead to a mushy subzi, therefore tossing is best technique when cooking.
*I prefer my bhindis to be crispy therefore I cooked them on high for few minutes to get that ‘burnt’ effect.
Cauliflower is one of the few vegetables that is low in carbohydrates, fats and high in fiber. It can be roasted, boiled, fried, steamed, or eaten raw. They are also great source of Vitamin C and other antioxidants.
Some vegetables pair really well together. Thats how I feel about Cauliflower and Potatoes. In the recent years, cauliflower has become a star on its own, especially in the world of pizza. Who would have thought five years ago, cauliflower crust would be such a hit.
Every region of India makes their version of cauliflower potatoes recipes. Below is my all time favorite recipe that I grew up eating majority of my life and still do at-least once a week. This vegetable can be served with rotis and rice. Hope you like the recipe and check out the instagram video to see how I made it.
Ingredients:
1- 2 medium sized Potatoes (Aloo) , peeled and cubed
1 medium Cauliflower (gobi) , washed and cut into florets
1/2 tsp chopped thai chilies*
1/2 tsp Black Mustard seeds
1 tsp Cumin seeds
1 tsp Turmeric powder
1 tsp Coriander powder
1 tsp Garam masala powder
1.5 tsp Red Chilli powder*
Coriander Leaves , finely chopped for garnish
Oil (your choice: I used Olive Oil)*
Salt and Sugar, adjust to taste
Begin by heating oil in a heavy bottomed pan; add cumin seeds, black mustard seeds and allow them to crackle. Add the chopped chilis.
Add the potatoes and cauliflower florets.
Stir the mixture and add the red chilli powder, turmeric powder, garam masala, coriander powder, salt and sprinkle some water. Stir the aloo gobi sabzi until all the masala gets well coated into the vegetables.
Cover the pan and allow the Aloo Gobi sabzi to steam cook together along with the masalas for 10-15 minutes. Once done, check the salt and spice levels and adjust according to your taste and turn off the heat.
Garnish with chopped coriander leaves and serve.
Tips:
*Chilis are optional, if you can’t find thai chilis, they can be substituted with jalapeños.
* Vegetable, Canola or Sunflower oil are also great choices for this recipe.
*Adjust the amount of Red Chili powder to accomodate your spice tolerance
Call it Pickle, Athanu, Achaar, etc. every Indian household has some version of this bottled deliciousness. Mango season typically starts mid-March and lasts till July in India.
The following recipe is something I have seen being made my entire life. It is not the traditional recipe for pickles as the traditional way requires lots of sun drying and proper preparations. A simple google search will show you how to make it traditional way.
This quick version recipe has shorter shelf life than traditional method. On average, the shelf life for this quick version is about 2-3 weeks compared to traditional, where it will last you few months.
I hope you are able to enjoy this popular accompaniment. It pairs really well with any main course or parathas, theplas or even bread (yes I have eaten pickle with bread, don’t judge LOL)
Ingredients:
1.5 cups raw mango cubed (makes sure its green mango)
2 tbsp salt
3/4 cup of Olive Oil or Vegetable/Canola Oil
1/2 cup of split mustard seeds
1/4 cup of athanu masalo /pickle masala
1 tbsp Red chili powder (optional)
1/2 tsp sugar (adjust per taste)
Instructions:
Cut the mango in cubes and let them rest in a large bowl. I stored mine in a glass Pyrex bowl.
Add all of the ingredients except the oil and mix it well.
In a pan heat the oil, it does not need to be boiling hot but a level below. The best way to test is to add few mustards seeds. When the mustard seeds start to crackle, your oil is ready.
Turn off the stove and add the oil to your mixture.
Allow it to sit for at-least 10 minutes before transferring to an airtight container or covering your Pyrex bowl.
Refrigerate once it cools down or Enjoy it right away.
Tips:
*Always use a dry spoon when using and keep refrigerated for long shelf life.
*Shelf life for this type of achaar is usually 2 weeks.
*Split mustard seeds and pickle masala can be found at a local Indo/Pak grocery stores.(I used Apex brand)
*Olive oil can be substituted for Canola or Vegetable oil.
*Red Chili powder is optional if you want it spicier.
There is a major pandemic, and the best we are doing is baking banana bread, Lots of it!! Haha. When the quarantine started, the majority of the people like myself thought, this would be short-lived, and in a few months, we will be back to somewhat normal. A lot of creativeness, zoom callings, TikTok’s, binge-watching on all of the streaming platforms later, the one thing that brought the entire world together is Banana Bread, also known as Quarantine Bread.
At first, I did not understand the concept, but after giving it some more profound thought, the reasoning is quite simple. Although its not the first go-to recipe for everyone, it’s also not discounted for either. During uncertain times, regardless of the pandemic, food is the primary source of comfort. Then the act of baking not only indulges our senses but also makes our home smell amazing, which is often nurturing for some. Secondly, the majority of the population like bananas, I personally do not know anyone that does not like bananas (being allergic is a different story). It is also one of those fruits that are inexpensive and readily available at all times. Lastly, banana bread is straightforward, not too overly sweet, could be consumed pretty much any time of the day, and comforting to the soul. Which is exactly what everyone needs during these unprecedented times. And honestly, after scrolling through social media and seeing all of the posts/pics, how can one not be tempted to make it!!
I am not much of a baker, I was not sure how this would turn out, especially since baking is not my forté. I have adapted this recipe to my likings, so please feel free to add your creativity to it. It is entirely eggless and vegan friendly.
Ingredients:
3-5 ripe bananas
2 cups all-purpose flour
2.5 tsp baking powder
1/4 cup of maple syrup
3 tsp of chia seeds
1/2 cup of chopped walnuts
1 tsp of pumpkin spice powder or cinnamon (optional)
Directions:
Preheat the oven to 350F. Take a loaf pan and spray it with nonstick spray.
In a bowl, start mashing bananas and maple syrup. You can add your pumpkin spice powder or cinnamon with the banana smash.
In another bowl, combine flour, baking powder, walnuts, and chia seeds. Mix in the wet ingredients in the flour. Try not to overmix, as it can create denser bread.
Transfer the batter to the pan and top it with pumpkin spice powder and whole walnuts.
Let it bake for 45 minutes. Insert a toothpick or knife in the center to check if it has cooked. If the toothpick comes out with few crumbs, it’s a sign that the bread is baked.
Tips:
*Always remember the adding ingredients. It is always better to add wet ingredients to dry ingredients.
*if you have nuts allergies, you can completely eliminate the walnuts and substitute it with sliced bananas, chocolate chips, etc.
*When mixing the batter, you can use dairy or nondairy milk to make the batter.
Who doesn’t love Taco Bell? My usual order consisted of Mexican Pizza, Chalupa, Cheesy Beans & Rice Burrito, or Crunchwrap Supreme or #4. Haha. I am sure you have your favorites. Today, I am sharing one of my favorite recipes to help you curb those quarantined hunger pangs. I know the original Taco Bell recipe uses garlic and onion, I don’t care for those, so I did not add them to my recipe. However, feel free to add it yours to enhance the taste.
Ingredients:
8 medium-sized tortillas
1 can of refried beans or canned black/red kidney beans
1.5 Tbsp taco seasoning
¼ cup of water
1 tsp red chili powder
2 tsp oil
Salt as needed
Taco bell sauce or Ortega Taco sauce
Mexican Blend Cheese
1 small tomato, chopped
1 tsp garlic powder (optional)
1 small onion, chopped (optional)
2 spring onions, chopped (optional)
2-3 chopped fresh or pickled jalapeño
Directions:
In a small pot heat oil, add the refried beans or canned beans, water, red chili powder, and taco seasoning. Mix everything well, then set it aside.
When using the canned beans, you can use a potato masher or hand blender to crush the beans.
Set the air fryer at 400 degrees and let tortillas cook for 3-4 minutes or until they are crispy. Use the grill to ensure they stay flat.
On a fried tortilla spread the beans mixture, top it with some cheese. Put another fried tortilla spread on the sauce and top it with more cheese.
At this point, you can also top it with tomatoes, onion, and jalapeño
Put the pizza in the oven and toast for 2-3 minutes or until the cheese has melted. Repeat the process for each pizza.
Tips:
If you are using store-bought taco sauce, it can taste bit tangy, I usually dilute the sauce with few teaspoons of sugar to balance out the tanginess.
Air Fried tortillas taste dryer than healthy Mexican Pizzas. Feel free to use more sauce to even out the dryness. I used Mission Brand Carb Balance tortillas.
You can also shallow fry the tortillas until golden brown for the traditional way.
You can also add a layer Sour Cream or Queso or both on top of the bean layer to amplify the pizza.
We own the Cuisinart TOA-60 Air Fryer, certain air fryers may require higher or lower temperature settings. Please don’t walk away from the air fryer during the baking processes as the tortillas can burn rapidly. Please refer to your air fryer instructions for proper temperature settings.
Buddha Bowl a decadent bowl full of whole grains, protein, and vegetables. Usually served cold. Mostly, it’s an overstuffed bowl resembling the belly of Buddha. These bowls blowing up on Pinterest due to the fact, how simple and satisfying they are. Some may call these Macro Bowls, Hippie Bowls, or Sunshine Bowls. Same thing, just different labels.
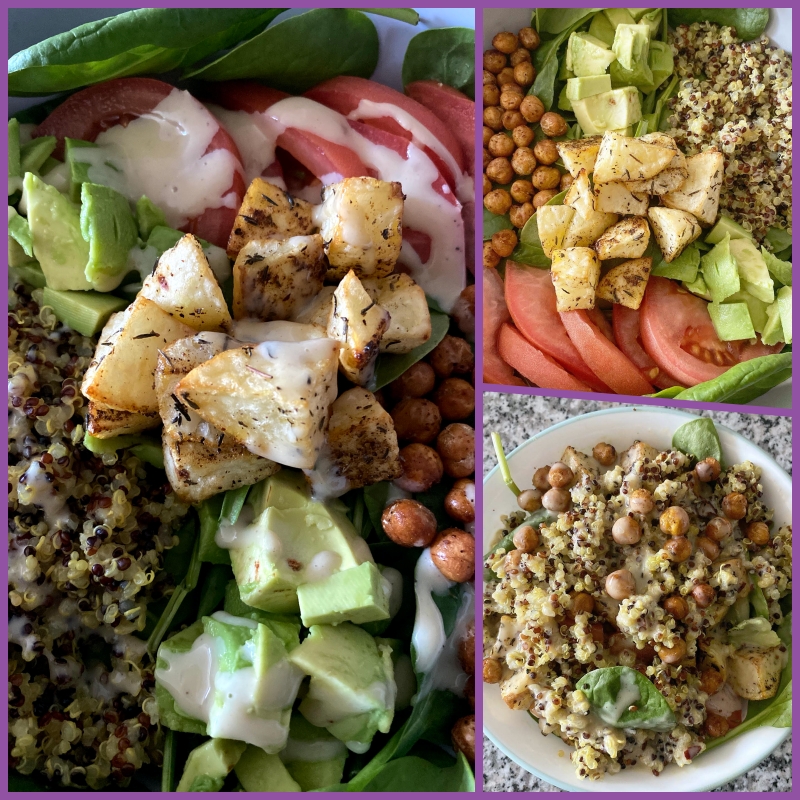
I made this bowl with Harissa Chickpeas, Turmeric Quinoa (plain cooked quinoa works well too), Avocado, Rosemary Potatoes, Tomatoes on a bed of Spinach drizzled with Tahini Dressing.
Harrisa Chickpeas
1 can of chickpeas drained
2 Tbsp of Harrisa powder*
2 tsp olive oil
Salt as needed
Preheat oven to 400 degrees Fahrenheit and Drain the chickpeas
In a bowl, mix the chickpeas, harissa powder, salt, and oil. Ensure the powder is coated well on the chickpeas. You can add more powder if you’d like it spicier
Place parchment paper on a baking tray and spread the chickpeas – Roast at 400F for 20 mins.OR Air fryer at 375F for 20 mins shake every 10 minutes. – Remove from the oven and enjoy!
Tip: It’s best to use chickpeas in a day or day after. After a time, they lose their crispiness. Store them at room temperature in a jar or cover with foil.
Tahini Dressing
1/3 cup Tahini
3 Tbsp lemon juice
1-2 Tbsp maple syrup
Salt and Black Pepper as needed
3 Tbsp water to thin the dressing
Mix all the ingredients except water and whisk to combine
Adjust the flavor as needed by adding more lemon juice or maple syrup.
While whisking slowly, add water until it’s creamy.
Tip: It can be stored in the fridge for up to 5 days.
Rosemary Potatoes
2 small potatoes, cut into 1 in pieces
2 Tbsp olive oil
1-2 tsp dried Rosemary
Salt and black pepper as needed
Mix oil, Rosemary, salt, and pepper. Add in the potatoes.
Place the potatoes into the air fryer. Set at 375 F and cook for 25-30 mins, shaking every 10 mins until potatoes are tender ORBake it in the oven at 400F for 25 mins, stirring every 10 mins
Turmeric Quinoa
1cupquinoa
2cups ofwater
½teaspoonsalt
2 tsp turmeric powder
Place quinoa in a medium-sized bowl and cover with cold water. Soak for 2 minutes.
Transfer soaked quinoa to a fine-mesh strainer or sieve. Rinse quinoa under cold running water for 30 seconds until water runs clear.
Shake to remove excess water and transfer to a medium-sized pot fitted with a lid.
Add 2 cups of cold water, turmeric and salt to the pot. Bring water to boil over high heat.
Once the water boils, immediately reduce heat to medium-low.
Cover pot and simmer until quinoa absorbs all of the water and is tender about 15 to 20 minutes. If the quinoa still looks wet, continue to cook, checking every 5 minutes.
Turn off heat and let stand, covered 5 to 10 minutes. Fluff with a fork to separate the grains.
Tip: You can eliminate turmeric if you do not have it on hand. Quinoa can be stored up to 3-5days.
Directions for bowl assembly:
In a bowl lay a bed of Spinach on the base, add your toppings, and pour your dressing. The possibilities are endless with this dish.
A super light, healthy, and refreshing salad. Just right for that hot season that is upon us.
The watermelon can be grilled if needed. If the berries are not sweet, you can add more sugar in the dressing to compensate for the sourness of the fruits. Microgreens can be expensive, therefore substituting for spinach or arugula would also work with this salad dish. Overall, it requires a very minimum amount of ingredients and tastes just divine.
Ingredients:
1 sliced watermelon (medium to thin)
1 cup of microgreens
1 tsp Feta cheese (optional)
1/2 cup of fresh blueberries
1/2 cup of cut fresh strawberries
1 Tbsp of sliced or slivered almonds
For Sweet Dressing:
1/4 cup olive oil
1/4 cup cider vinegar
2 tablespoons sugar
1 tsp mustard
2 tsp of poppy seeds (optional)
Salt and pepper to taste
Directions:
On a salad plate, place the slice of watermelon, top it with microgreens, blueberries, and strawberries.
In a bowl, add all of the ingredients for the dressing and whisk until creamy consistency forms. Adjust the sugar ratio is necessary especially if the berries are not sweet.
Pour the dressing on to the salad and top it with feta cheese and almonds.
Butternut Squash is considered a winter squash; hence you mainly see them at your local grocer during the colder months. An excellent source of vitamins (Vitamin A, C, B6), and minerals. It helps improve vision, good for heart health, and boost immunity.
Butternut Squash, a vegetable that took quite some time for me to like, but once I broke through it, it was instant love. Many years ago, I made this version of Butternut Squash. It was simple and delicious. Then, I made this sandwich a few months after, and the rest is history.
I have used few spices to bring out the sweet, nutty flavor of the squash; however if you rather stay away from spices, than you can totally substitute for a herb like rosemary. You can also make it vegan by eliminating the cheese during the sandwich assembly.
I love the simplicity of this dish, it can be enjoyed for lunch, dinner or as a side dish. Hope you all enjoy it as well.
Ingredients:
2 cups cubed butternut squash
1 Tbsp of olive oil
1 tsp of mustard seeds (optional)
1 tsp of cumin seeds
1.5 Tbsp of paprika or red chili powder
1 Tbsp of turmeric
1 tsp of grated ginger
Salt and black pepper as needed
For Sandwich:
1 Ciabatta Roll/Bread
1 Tbsp Butter
1/2 cup of Spring Salad Mix or your choice of salad
2-3 slices of tomatoes
1 slice of Mozzarella Cheese (shredded or sliced)
Directions:
Preheat the oven to 400 degrees F.
Spray a baking tray with nonstick spray and toss the cubed squash on the tray. Let it bake for 15 minutes until butternut squash is tender.
Once baked, you have two options to prepare the squash:
Toss all the squash with paprika, turmeric, salt, and pepper.
In a pan, heat 1 tsp of oil, temper the mustard seeds, and cumin seeds. Add the squash with ginger, paprika, turmeric, salt, and pepper. Let it cook for 10 minutes.
Heat a small skillet (nonstick, ideally) over medium. Slide-in half of butter. When it melts, place two slices of bread, in skillet; top with cheese on both of the slices; let it melt facing up. Take it off the skillet.
Start by placing the squash mixture on one of the slices, top it with tomatoes, and salad mix. Place the second slice on top and Enjoy!
Heat a deep, heavy-bottomed pan on a medium flame and put the butter sticks in it. Simmer it and allow to melt and then cook.
The first layer that will be frothy, you can either dispose of it or keep cooking until the froth has been removed or mixed in
Continue to melt the butter until the color starts to change to golden yellow. Be careful during this step as cooking for more extended periods may lead to burnt ghee.
Allow the mixture to cool. Strain or filter the ghee into a jar.
The color should be a pale golden color.
The entire process takes about 20 minutes. It can be stored in the container for about 4-6 months. Usually, I leave mine under the dark area on my countertop. The taste of homemade ghee is so much better than store-bought.
The image below yielded two sticks of butter. If you are making ghee for a larger family, I would highly recommend using more than two sticks.
Grind garlic, ginger, cilantro and green chilies into a rough paste (use food processor or just mince it finely)
Heat large pot over medium heat. Once heated, add oil, cumin seeds let it simmer, add onions, chili paste (made above) and salt
Let it cook till golden brown and add coriander, chili powder, and turmeric. If it starts to stick, add more oil as needed
Next, add tomatoes and stir to coat. Let the tomatoes simmer, add chickpeas and salt. The mixture may look thick, add water as needed. It should be semi-thick consistency.
Increase the heat until it reaches a rolling simmer. Add garam masala. Stir occasionally. Adjust seasonings as needed.
Reduce the heat to low and leave it uncovered to maintain the simmer for 15-20 minutes. The water should have cooked down by now into a thick stew-like consistency
When the Chana is thickened and bubbly, remove from heat and add lemon juice. Stir to mix and let it cool slightly. Garnish with fresh cilantro before serving.
Enjoy with rice or cauliflower rice. It can be stored in the refrigerator for up to 4 days and can be in the freezer for up to 1 month.
Tips:
* If you don’t have garam masala, you can make your own by grinding 2 small red chilis, ½ tsp black pepper, 1 tsp cumin seeds, ½ cardamom, ¼ tsp ground cloves, and 1/8 tsp nutmeg. You can use mortar pestle or spice grinder to mix it into a powder
* Curry powder can be used as a substitute for garam masala
Go ahead! Finish looking at the pictures and take in the warmth of Mumbai. Of course, the deliciousness of the food is the icing on the cake. I am truly very excited to share this post with you all. In December 2015, my husband and I went to India for a family wedding. We traveled mostly in Gujarat and few parts of Mumbai. First, let’s talk about the awesome Mumbai airport, it is just work of art. Incredible design and definitely have earned few awards. Then came the cleanliness and courtesy of employees, never thought Mumbai would have changed so much for the better. Day 1 of our trip was mainly spent at the airport since we had a connection to Ahmedabad. It was a very tiring 24 hours journey, but all worth it. From Ahmedabad, we then proceeded to Anand where my family stayed. My paternal aunt has a bungalow where all of my family members (about 20 people) were staying for the big fat wedding. Yes, I am blessed with a large family. We reached around 6 am on Saturday and the welcome that we received from all of the family members was priceless. It had been a long journey however just seeing all of them together and my parents, it took away all of the tiredness. The next few days we spent in the wedding festivities, dancing, laughing, and running around like chickens with no heads. If any of you have been part of a wedding, you know exactly what I am talking about. Once the wedding was over, we all proceeded to Mumbai, in a CAR!!! OH EM GEE, never ever am I sitting in a car for that many hours again. The most painful part of the trip was this car ride from Anand to Mumbai. For the most part, I spent trying to sleep and other parts joking and laughing with my younger cousin sister. After 15 hours, we reached Mumbai! Woohoo! I was happy again. Due to the traffic and route reasons, we stopped in Dahisar and took a taxi to our hotel directly.
We stayed at JW Marriott Juhu in Andheri. When I was young, we use to pass by this JW Marriott hotel all the time and I always wondered what it looked like on the inside. Who knew one day I would be staying at the same hotel. For those of you unfamiliar with this area of Mumbai, it is one of the most expensive neighborhoods in Mumbai, it is also close to Juhu beach which is one of the popular tourist attractions in Mumbai.
Ahhh!! so much to do, see, eat, shop and show to the husband. Luckily my parents were around for few more days, therefore I told my dad to take care of the husband while I go shop with my aunts. Such a good wife. Haha! My dad basically took him on a joy ride on the Mumbai train. Obviously, they went during non-rush hour time, otherwise, they would have never made it on the train. If there is one thing to avoid in Mumbai is the rush hour train commuters. One does not want to mess with the commuters on the overcrowded trains. Yes, it’s that crazy. The Mumbai Suburban Railway is the busiest rapid transit system in the world and Mumbaikars are not to be reckoned with. We spent the next week traveling all around Mumbai, shopping, eating lots of vada pavs, spending time with family, and just simply living the Mumbai life.
Mumbai will always have a special place in my heart and I don’t just say that because I grew up there. No matter in which corner of the world I am in, Mumbai will always be home, because it is Mumbai, meri Jaan. #AlwaysMumbaikar